我在這篇中針對 [ 陣列 ] 的元素位置與順序做一番強調 ! 關於 [ 陣列 ] 元素位置的算法, 這個觀念非常非常重要 ! 如果在觀念上誤解的話, 那麼在存取陣列裡的資料時, 將會產生難以察覺的人為錯誤. 不可不慎 !
我門以下面這兩個例題來做說明 :
1.有一個二維陣列宣告如下,請問score[3][2]的值是多少?
int score[][3] = { {85,78,65},
{75,85,69},
{63,67,95},
{94,92,88},
{74,65,73} };
2.有一個二維陣列宣告如下,請問score[3][2]的值是多少?
int score[5][3] ={0};
這兩題可以用以下的程式碼來驗證 :
// c++ 程式碼
#include <iostream>
using namespace std;
int main()
{
int score1[][3] = { {85,78,65}, {75,85,69}, {63,67,95},
{94,92,88}, {74,65,73} };
cout << "score1[3][2] = " << score1[3][2] << endl;
int score2[5][3] ={0};
cout << "score2[3][2] = " << score2[3][2] << endl;
system("pause");
}
題 1 答案 : 88
題 2 答案 : 0
解析 :
再度強調 ! 陣列基底由 0 起算, 不是由 1 起算 !
第 1 題 score[3][2] 的內容, 第一維陣列元素為 [3], 對應到大括號內的大括號, 我用顏色來標明 { { .... }, { .... }, { ..... }, { .... }, { .... } } 其元素位置相當於 0, 1, 2, 3, 4 ; 接著, 第二維陣列元素為 [2], 則表示指向上面那個紅色 { ..... } 內容中的 { 94,92,88 }, 其元素位置相當於 0, 1, 2
第 2 題 因為 int score[5][3] ={0}; 整個陣列內容都沒有設定完全, 因此二維陣列score[3][2]的內容也是一樣沒有被指定, 所以預設初值則為 0
2012-03-04


2012-03-03
陣列元素位置的起算法(一)
這是我幫一位學生解析其程式的內容, 程式內最後 x 的值為何 ?
#include <iostream>
using std::cout;
using std::endl;
int mystery2(const char *s);
int main( )
{
char *string1 = "MingChi University"; //字串
char string2[] = "Electrical Engineering";
mystery2(&string1[2]);
cout<< mystery2(&string2[3]) <<endl;
}
int mystery2(const char *s)
{
static int x = 0;
for ( ; *s != '\0' ; s++)
x += (( *s != 'i' ) ? 1 : 0 );
return x;
}
解析如下 :
程式中 mystery2(&string1[2]); 字串 "MingChi University" 會由第 3 個(含)算起 , 包括空白 , 於 mystery2 函式中作累計(累計的值放入 x) , 並將 "i" 省略不計 , 累計結果共 13 個字 , 接著 mystery2(&string2[3]); 字串 "Electrical Engineering" 會由第 4 個(含)算起 , 包括空白 , 同樣經過 mystery2 函式將 "i" 省略不計 , 累計共 16 個字 , 在 mystery2 函式中 x 宣告為 static , 因此執行第一次時 x 的值累計為 13 , 再執行第二次時 x 的值就從 13 開始累計 , 執行第二次完(16次) , 共累計了 13 +16 = 29 次 . 所以 x = 29 .
請注意陣列基底由0算起 .
此題目來源在以下網址 :
http://tw.knowledge.yahoo.com/question/question?qid=1607051402495
#include <iostream>
using std::cout;
using std::endl;
int mystery2(const char *s);
int main( )
{
char *string1 = "MingChi University"; //字串
char string2[] = "Electrical Engineering";
mystery2(&string1[2]);
cout<< mystery2(&string2[3]) <<endl;
}
int mystery2(const char *s)
{
static int x = 0;
for ( ; *s != '\0' ; s++)
x += (( *s != 'i' ) ? 1 : 0 );
return x;
}
解析如下 :
程式中 mystery2(&string1[2]); 字串 "MingChi University" 會由第 3 個(含)算起 , 包括空白 , 於 mystery2 函式中作累計(累計的值放入 x) , 並將 "i" 省略不計 , 累計結果共 13 個字 , 接著 mystery2(&string2[3]); 字串 "Electrical Engineering" 會由第 4 個(含)算起 , 包括空白 , 同樣經過 mystery2 函式將 "i" 省略不計 , 累計共 16 個字 , 在 mystery2 函式中 x 宣告為 static , 因此執行第一次時 x 的值累計為 13 , 再執行第二次時 x 的值就從 13 開始累計 , 執行第二次完(16次) , 共累計了 13 +16 = 29 次 . 所以 x = 29 .
請注意陣列基底由0算起 .
此題目來源在以下網址 :
http://tw.knowledge.yahoo.com/question/question?qid=1607051402495
2012-03-01
Android 小程式 : 亂數與氣泡排序法
這一次我要挑戰用 Android 模擬器來完成以下的功能 :
以亂數產生10 組號碼 (0 ~ 99), 然後利用氣泡排序法以及降幕方式排列將結果顯示出來 !
運作原理 :
亂數產生的部分我使用 Math.random() 內建函數, 它會產生 0.0 ~ 0.1 的值, 由於其型態為 double, 我將它轉換型態成為 int 後, 讓它以整數型態呈現, 按下 [ 開始 ] 按鈕後產生 10 組亂數, 並同時進行排序, 程式中我用氣泡排序法, 讓數值由小到大排列.
程式碼如下 :
import ... (略)
public class RndAndSort extends Activity {
/** Called when the activity is first created. */
int[] sort = new int[10];
int rnd;
String st,temp;
@Override
public void onCreate(Bundle savedInstanceState) {
super.onCreate(savedInstanceState);
setContentView(R.layout.main);
final TextView textView1=(TextView)findViewById(R.id.textView1);
final TextView textView2=(TextView)findViewById(R.id.textView2);
final Button button1=(Button)findViewById(R.id.button1);
button1.setOnClickListener(new OnClickListener() {
public void onClick(View v) {
st = ""; temp = "";
for (int i=0; i<10; i++) {
rnd = (int)(Math.random() * 100);
sort[i] = rnd;
temp = String.valueOf(rnd);
st += (temp + ", ");
}
textView1.setText(st);
for (int i=0; i<9; i++)
for (int j=i+1; j<10; j++)
// 改變下式中的大、小於符號可變更排列順序
// < 由大到小, > 為小到大排列
if(sort[i]>sort[j])
{
int tempNum;
tempNum=sort[i];
sort[i]=sort[j];
sort[j]=tempNum;
}
st = "";
for (int i=0; i<10; i++)
st += (String.valueOf(sort[i]) + ", ");
textView2.setText(st);
}
});
}
}
以亂數產生10 組號碼 (0 ~ 99), 然後利用氣泡排序法以及降幕方式排列將結果顯示出來 !
運作原理 :
亂數產生的部分我使用 Math.random() 內建函數, 它會產生 0.0 ~ 0.1 的值, 由於其型態為 double, 我將它轉換型態成為 int 後, 讓它以整數型態呈現, 按下 [ 開始 ] 按鈕後產生 10 組亂數, 並同時進行排序, 程式中我用氣泡排序法, 讓數值由小到大排列.
 |
| 第一次執行的畫面 |
 |
| 按下開始鈕後的執行畫面 |
程式碼如下 :
import ... (略)
public class RndAndSort extends Activity {
/** Called when the activity is first created. */
int[] sort = new int[10];
int rnd;
String st,temp;
@Override
public void onCreate(Bundle savedInstanceState) {
super.onCreate(savedInstanceState);
setContentView(R.layout.main);
final TextView textView1=(TextView)findViewById(R.id.textView1);
final TextView textView2=(TextView)findViewById(R.id.textView2);
final Button button1=(Button)findViewById(R.id.button1);
button1.setOnClickListener(new OnClickListener() {
public void onClick(View v) {
st = ""; temp = "";
for (int i=0; i<10; i++) {
rnd = (int)(Math.random() * 100);
sort[i] = rnd;
temp = String.valueOf(rnd);
st += (temp + ", ");
}
textView1.setText(st);
for (int i=0; i<9; i++)
for (int j=i+1; j<10; j++)
// 改變下式中的大、小於符號可變更排列順序
// < 由大到小, > 為小到大排列
if(sort[i]>sort[j])
{
int tempNum;
tempNum=sort[i];
sort[i]=sort[j];
sort[j]=tempNum;
}
st = "";
for (int i=0; i<10; i++)
st += (String.valueOf(sort[i]) + ", ");
textView2.setText(st);
}
});
}
}
2012-02-28
Android 小程式 : 十進位數轉成十六進位
這次我用 Android 模擬器寫了一個 10 進位轉換成 16 進位的小程式.
先介紹何謂十六進位, 即 0,1,2,3,4,5,6,7,8,9,A,B,C,D,E,F
十進位數值從 10 到 15 的數值相對於十六進位的 A ~ F
A = 10; B = 11; C = 12; D = 13; E = 14; F = 15
運作原理 :
將輸入的十進位數值在迴圈中反覆進行除以 16 的動作, 並取其餘數放入字串陣列 ba [] 中, 最後再將陣列中的元素倒置過來顯示就可得到答案囉 !

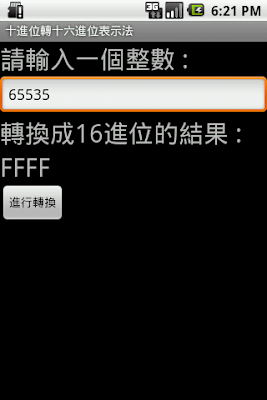
程式碼如下 :
import ... (此處略)
public class BtoD extends Activity {
/** Called when the activity is first created. */
int num,i;
String[] ba = new String[64];
String su;
@Override
public void onCreate(Bundle savedInstanceState) {
super.onCreate(savedInstanceState);
setContentView(R.layout.main);
final EditText editText1 = (EditText)findViewById(R.id.editText1);
final TextView textView3 = (TextView)findViewById(R.id.textView3);
final Button button1= (Button)findViewById(R.id.button1);
button1.setOnClickListener(new OnClickListener(){
@Override
public void onClick(View v) {
// TODO Auto-generated method stub
i = 0; su = "";
num = Integer.parseInt(editText1.getText().toString());
while ( num > 15 )
{
int temp = num % 16;
checkNum(temp);
i++;
num = num / 16;
}
checkNum(num);
for ( int j = i; j >= 0; j-- )
su += ba[j];
textView3.setText(su);
}
});
}
// 此函式檢查 10 ~ 15 所對應的 16 進位表示法
private void checkNum(int cn) {
if ( cn > 9 )
{
if (cn == 10) ba[i] = "A";
else if (cn == 11) ba[i] = "B";
else if (cn == 12) ba[i] = "C";
else if (cn == 13) ba[i] = "D";
else if (cn == 14) ba[i] = "E";
else if (cn == 15) ba[i] = "F";
}
else
ba[i] = String.valueOf(cn);
}
}
我在程式中設置了一個 checkNum() 函式, 用來判斷十進位數值 10 ~ 15 所對應的 A ~ F 字母 .^_^.
先介紹何謂十六進位, 即 0,1,2,3,4,5,6,7,8,9,A,B,C,D,E,F
十進位數值從 10 到 15 的數值相對於十六進位的 A ~ F
A = 10; B = 11; C = 12; D = 13; E = 14; F = 15
運作原理 :
將輸入的十進位數值在迴圈中反覆進行除以 16 的動作, 並取其餘數放入字串陣列 ba [] 中, 最後再將陣列中的元素倒置過來顯示就可得到答案囉 !

5629 轉成十六進位得出 15FD

65535 轉成十六進位得出 FFFF
搞程式設計的人對 65535 應該很熟才對 ^_^
程式碼如下 :
import ... (此處略)
public class BtoD extends Activity {
/** Called when the activity is first created. */
int num,i;
String[] ba = new String[64];
String su;
@Override
public void onCreate(Bundle savedInstanceState) {
super.onCreate(savedInstanceState);
setContentView(R.layout.main);
final EditText editText1 = (EditText)findViewById(R.id.editText1);
final TextView textView3 = (TextView)findViewById(R.id.textView3);
final Button button1= (Button)findViewById(R.id.button1);
button1.setOnClickListener(new OnClickListener(){
@Override
public void onClick(View v) {
// TODO Auto-generated method stub
i = 0; su = "";
num = Integer.parseInt(editText1.getText().toString());
while ( num > 15 )
{
int temp = num % 16;
checkNum(temp);
i++;
num = num / 16;
}
checkNum(num);
for ( int j = i; j >= 0; j-- )
su += ba[j];
textView3.setText(su);
}
});
}
// 此函式檢查 10 ~ 15 所對應的 16 進位表示法
private void checkNum(int cn) {
if ( cn > 9 )
{
if (cn == 10) ba[i] = "A";
else if (cn == 11) ba[i] = "B";
else if (cn == 12) ba[i] = "C";
else if (cn == 13) ba[i] = "D";
else if (cn == 14) ba[i] = "E";
else if (cn == 15) ba[i] = "F";
}
else
ba[i] = String.valueOf(cn);
}
}
我在程式中設置了一個 checkNum() 函式, 用來判斷十進位數值 10 ~ 15 所對應的 A ~ F 字母 .^_^.
Android 小程式 : 十進位數轉成二進位
我用 Android 模擬器做了一個 10 進位數值轉換成 2 進位的小程式 :

運作原理 :
程式中, 我將輸入的 10 進位數值以迴圈方式不斷用 2 去除, 每除一次所得的餘數 (為 0 或 1) 依序存入陣列中, 最後再用迴圈把陣列內容以倒置的方式取出, 便可得出答案.
程式碼如下 :
package a.b.c;
import android.app.Activity;
import android.os.Bundle;
import android.view.View;
import android.view.View.OnClickListener;
import android.widget.Button;
import android.widget.EditText;
import android.widget.TextView;
public class BtoD extends Activity {
/** Called when the activity is first created. */
int s,i;
int[] ba = new int[64];
String su;
@Override
public void onCreate(Bundle savedInstanceState) {
super.onCreate(savedInstanceState);
setContentView(R.layout.main);
final EditText editText1 = (EditText)findViewById(R.id.editText1);
final TextView textView3 = (TextView)findViewById(R.id.textView3);
final Button button1= (Button)findViewById(R.id.button1);
button1.setOnClickListener(new OnClickListener(){
@Override
public void onClick(View v) {
// TODO Auto-generated method stub
i = 0; su = "";
s = Integer.parseInt(editText1.getText().toString());
while (s > 1)
{
ba[i] = s % 2;
i++ ;
s = s/2;
}
if(s==1 || s==0)
ba[i] = s;
for(int j=i;j>=0;j--)
su += String.valueOf(ba[j]);
textView3.setText(su);
}
});
}
}
整個程式功能過於簡單 ~ 若上傳到 Android Market 會 ... 被笑啊 ! 我只把它當做練習而已 .^_^.
運作原理 :
程式中, 我將輸入的 10 進位數值以迴圈方式不斷用 2 去除, 每除一次所得的餘數 (為 0 或 1) 依序存入陣列中, 最後再用迴圈把陣列內容以倒置的方式取出, 便可得出答案.
程式碼如下 :
package a.b.c;
import android.app.Activity;
import android.os.Bundle;
import android.view.View;
import android.view.View.OnClickListener;
import android.widget.Button;
import android.widget.EditText;
import android.widget.TextView;
public class BtoD extends Activity {
/** Called when the activity is first created. */
int s,i;
int[] ba = new int[64];
String su;
@Override
public void onCreate(Bundle savedInstanceState) {
super.onCreate(savedInstanceState);
setContentView(R.layout.main);
final EditText editText1 = (EditText)findViewById(R.id.editText1);
final TextView textView3 = (TextView)findViewById(R.id.textView3);
final Button button1= (Button)findViewById(R.id.button1);
button1.setOnClickListener(new OnClickListener(){
@Override
public void onClick(View v) {
// TODO Auto-generated method stub
i = 0; su = "";
s = Integer.parseInt(editText1.getText().toString());
while (s > 1)
{
ba[i] = s % 2;
i++ ;
s = s/2;
}
if(s==1 || s==0)
ba[i] = s;
for(int j=i;j>=0;j--)
su += String.valueOf(ba[j]);
textView3.setText(su);
}
});
}
}
整個程式功能過於簡單 ~ 若上傳到 Android Market 會 ... 被笑啊 ! 我只把它當做練習而已 .^_^.
訂閱:
文章 (Atom)